NSR250.net Forums Logo: Honda NSR 250 Forums, Classifieds and Service Manual in English. Covering All Honda NSR 250 MC16, MC18, MC21 and MC28 models
NSR250.net Forums

#
 
#
 
Race Lubricants

  • NSR250 Forums Index ‹ Members' NSR Builds
  • Members Content
  • Members Garage
  • Subscription
  • Transactions
  • FAQ
  • Search
  • Register
  • Log in

NSR250 MC18 R5K Engine Rebuild


Reply to topic   printer-friendly view
Page 1 of 1   Download Topic


philup_7@hotmail.com

 
Posts: 70
Joined: 09 Oct 2018

Location: Worcestershire
    Send private message View user's profile
    Reply with quote  

NSR250 MC18 R5K Engine Rebuild

Mon Mar 09, 2026 3:08 pm » Post: #1 » Download Post

Hi All
It has been a fair while since I last wrote on the Forum due to various reasons (getting older is top of the list lol), but also been fairly busy sorting & rebuilding my son Chris’s NSR250 MC18 R5K with him.

But, before I start, can I thank all those on the NSR WORLD Forum (you all know who you are) for all their help & pointing me and Chris in the right direction as none of the following would have been possible, not forgetting all the invaluable information on the NSR WORLD site itself.

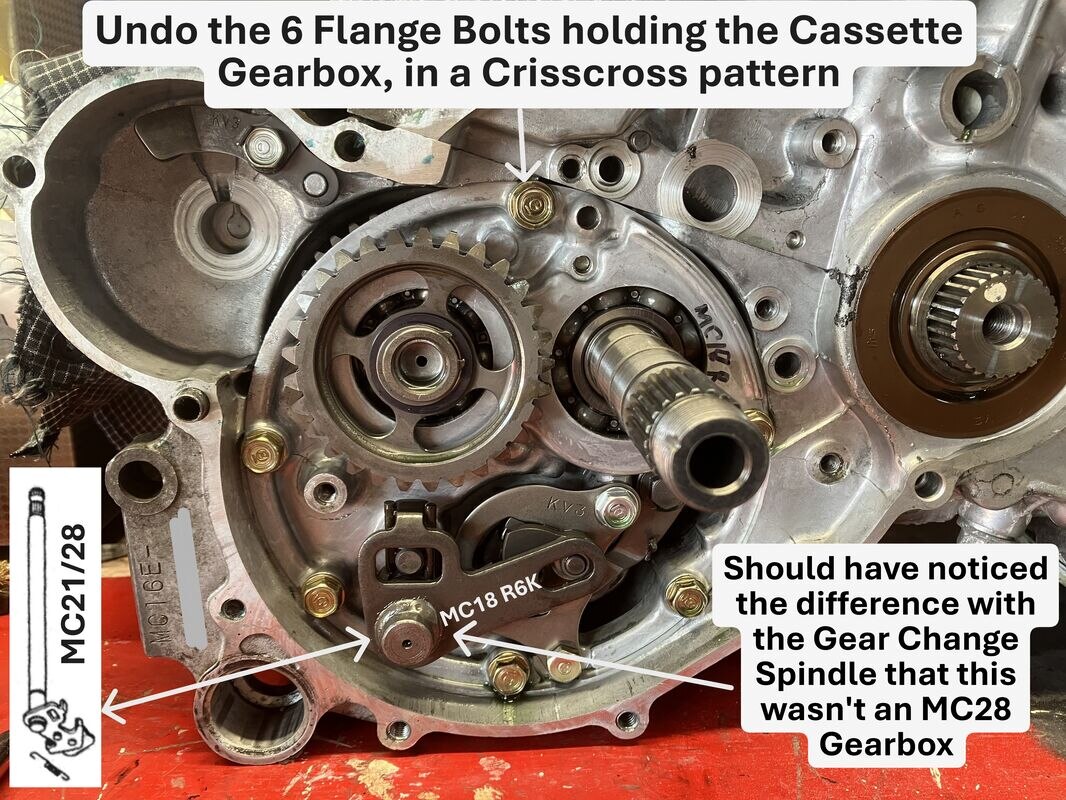
Our first attempt was to fit a used MC28 Engine to the MC18 which looked in reasonable enough condition to do. However, fitting the MC28 Engine into the MC18 threw up a number of issues, and items to be purchased, that although have been previously documented I guess it’s not till you try & do it you just don’t realise!

The issues & items required as follows:
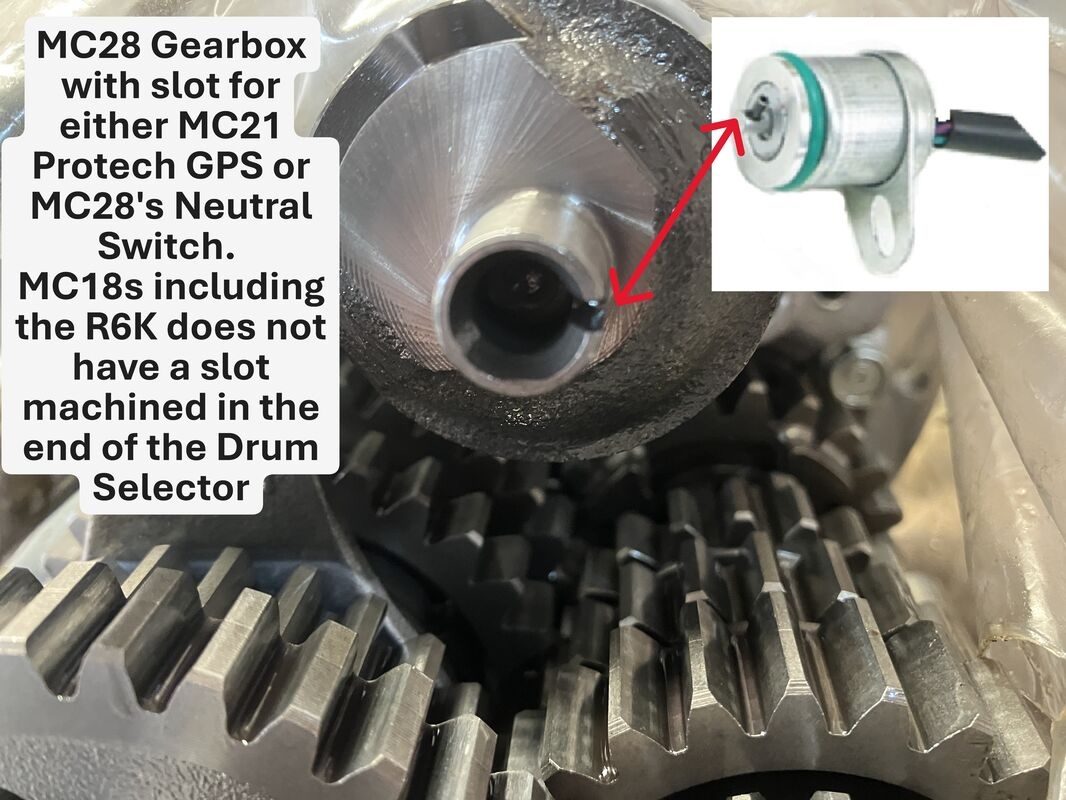
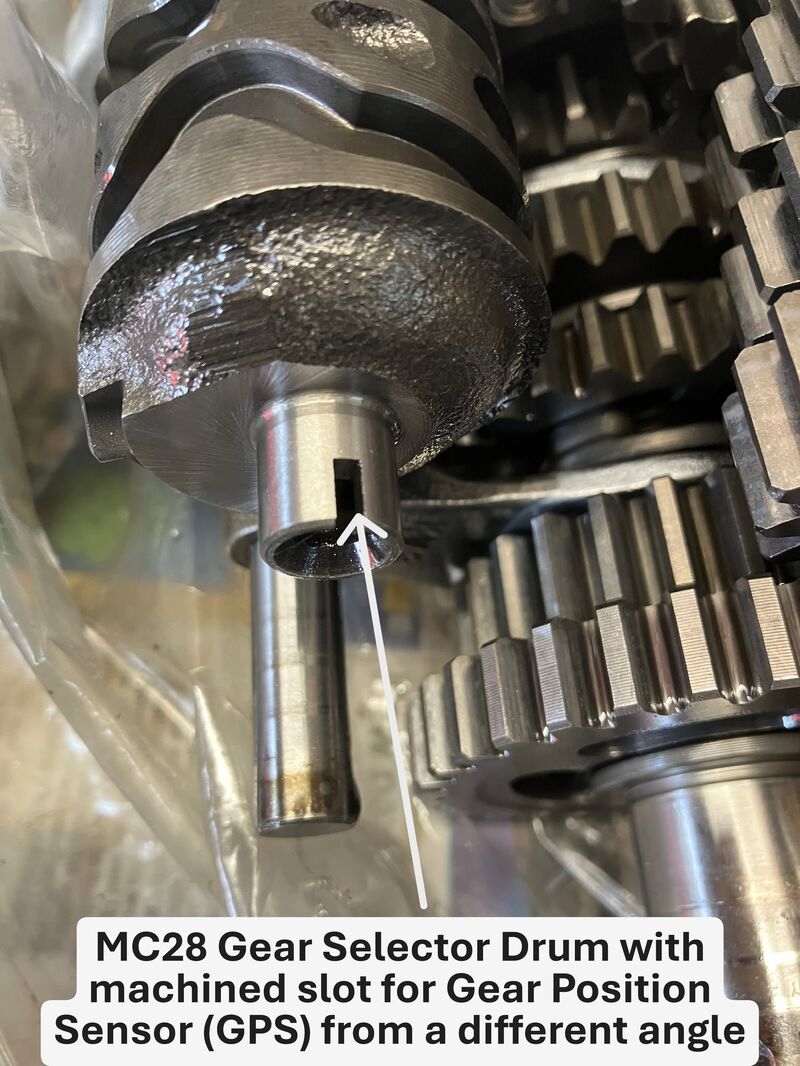
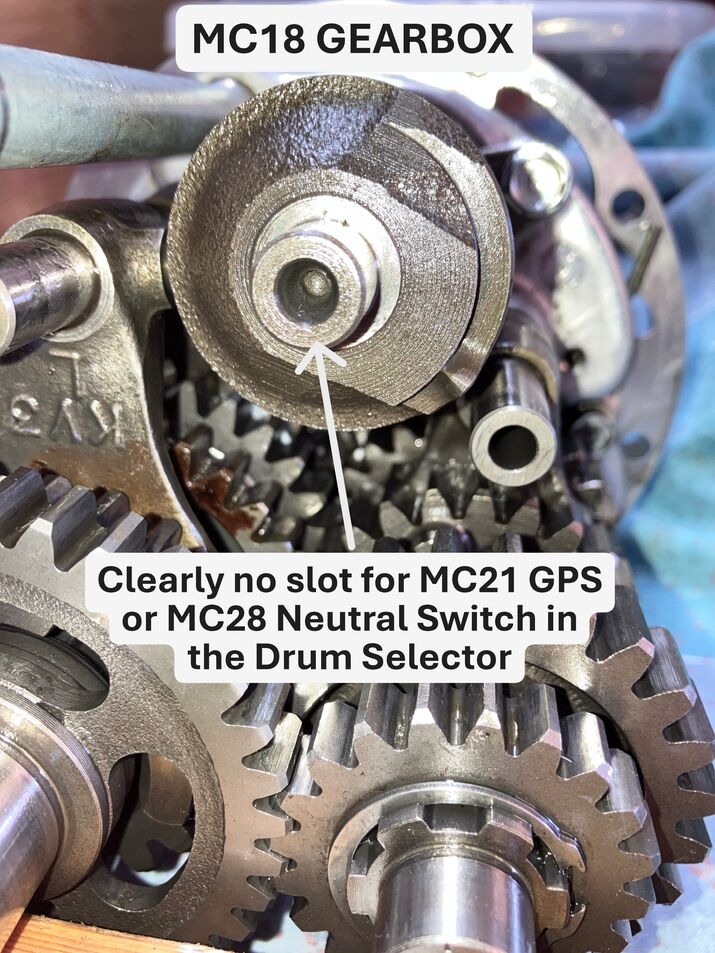
    (1) New/Used MC21 PROTEC GPS-01 Gear Position Sensor Product 11609 or MC28 Change Switch (MC18 Neutral Switch is not only completely different, it is also in a different position on the Crankcase to the MC21/28 & operates in a totally different way. Additionally, Neutral switch re-wiring is required, but this is not much of an issue.
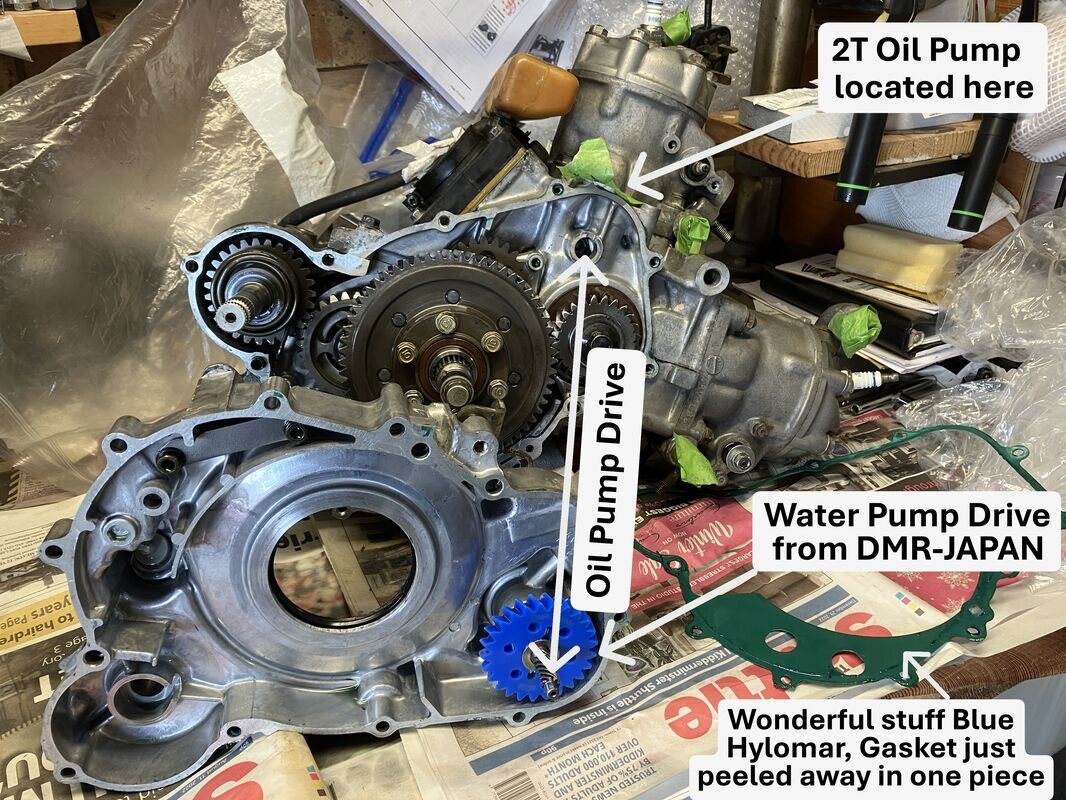
    (2) Used MC28 2T Oil Pump as one didn’t come with the Engine (MC28 2T Oil Pump has an additional Oil Way to the MC18);
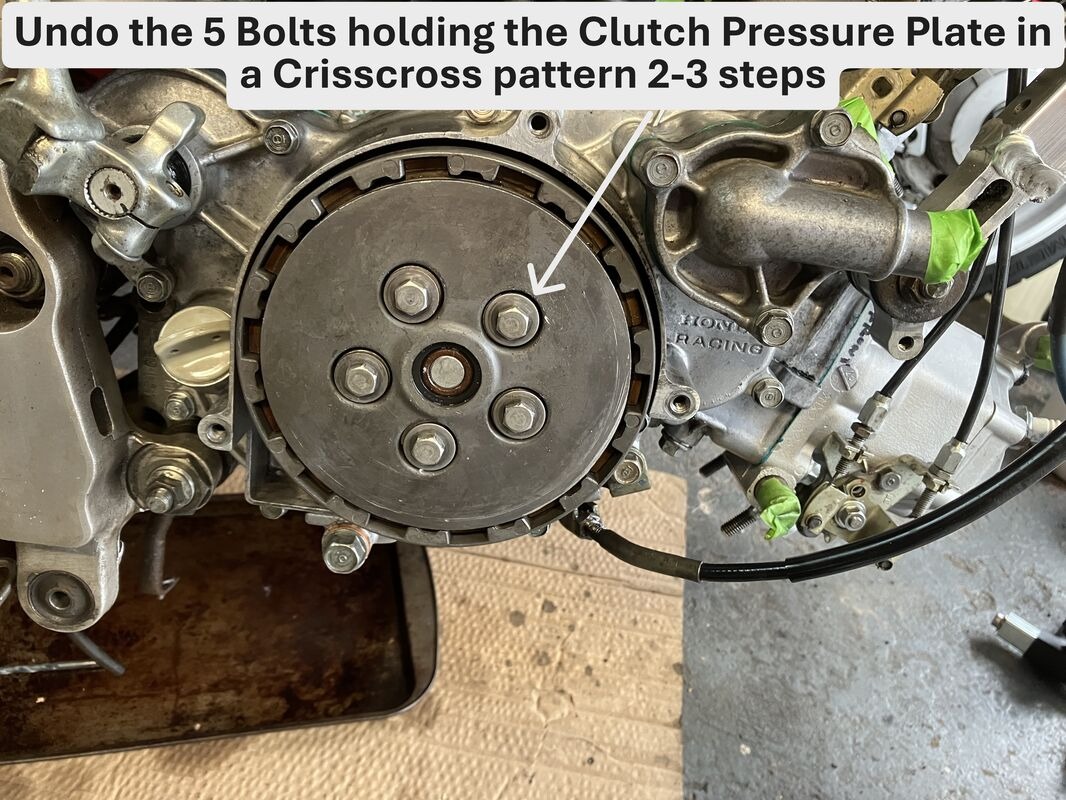
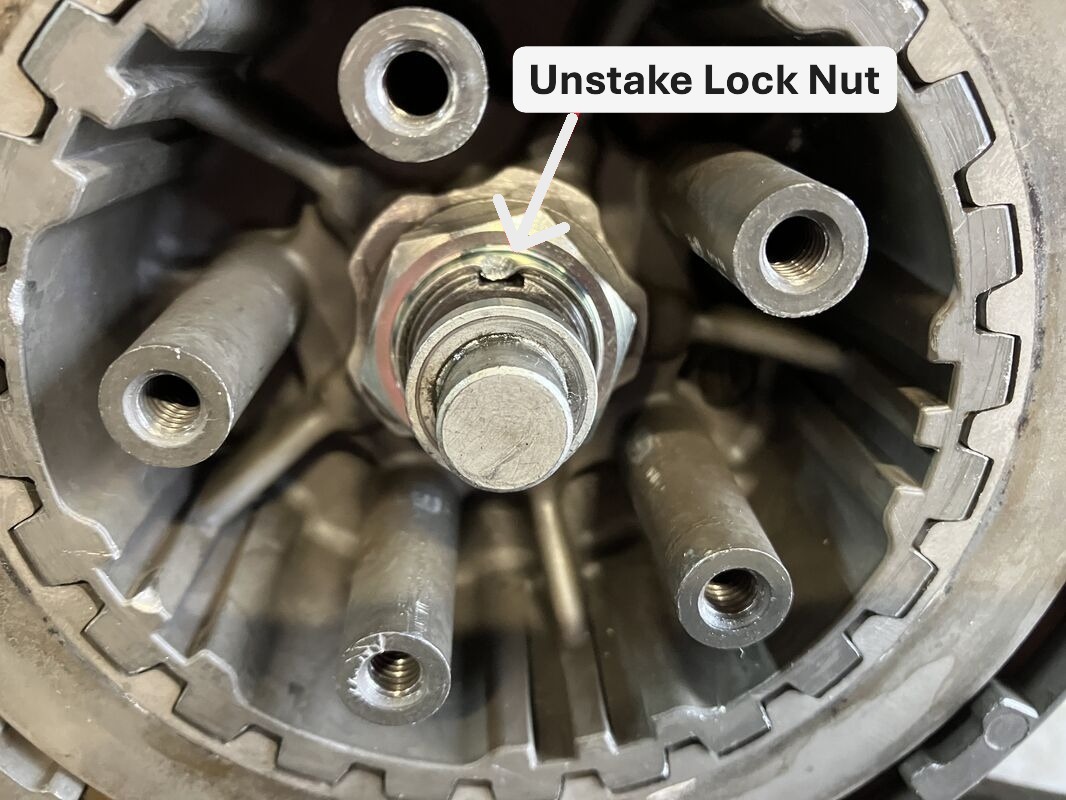
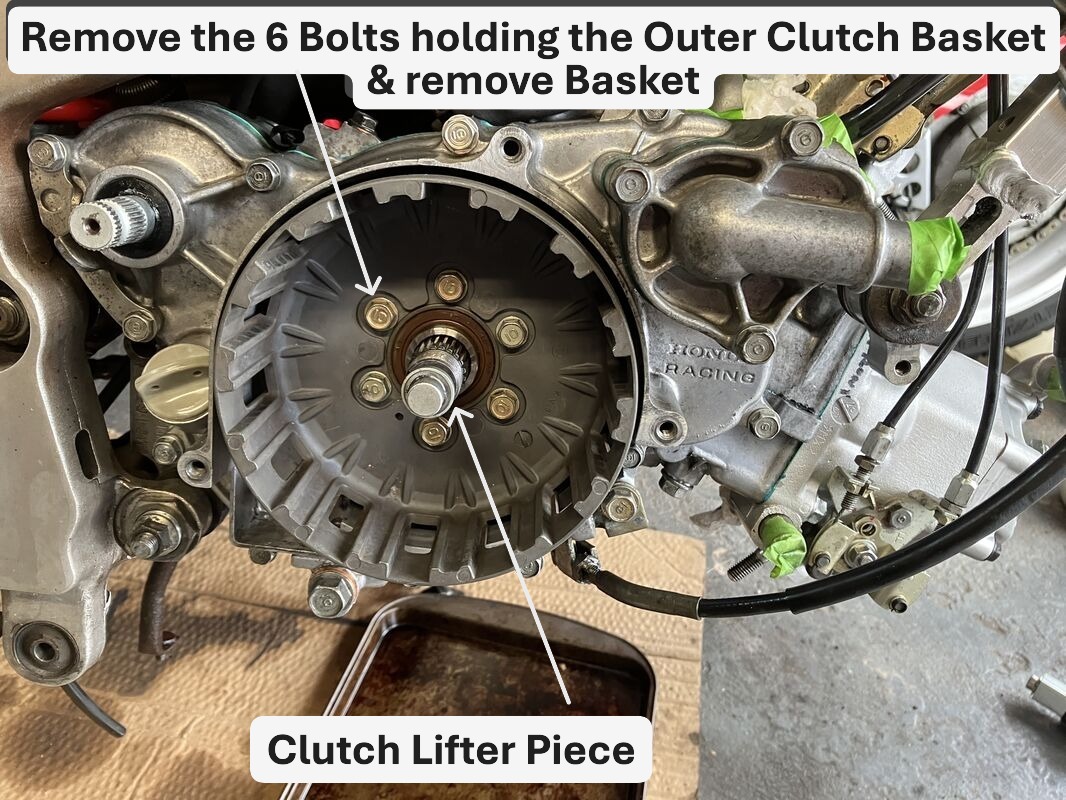
    (3) New DMR-JAPAN Dry Clutch Collars/Spacers (Original Spacers had worn so bad the Clutch didn’t work at all);
    (4) New DMR-JAPAN MC28 Water Pump, TYGA & DOGFIGHT RACING also supply their own one as well (The issue with the Water Pump arose when sorting the Clutch issue above out);
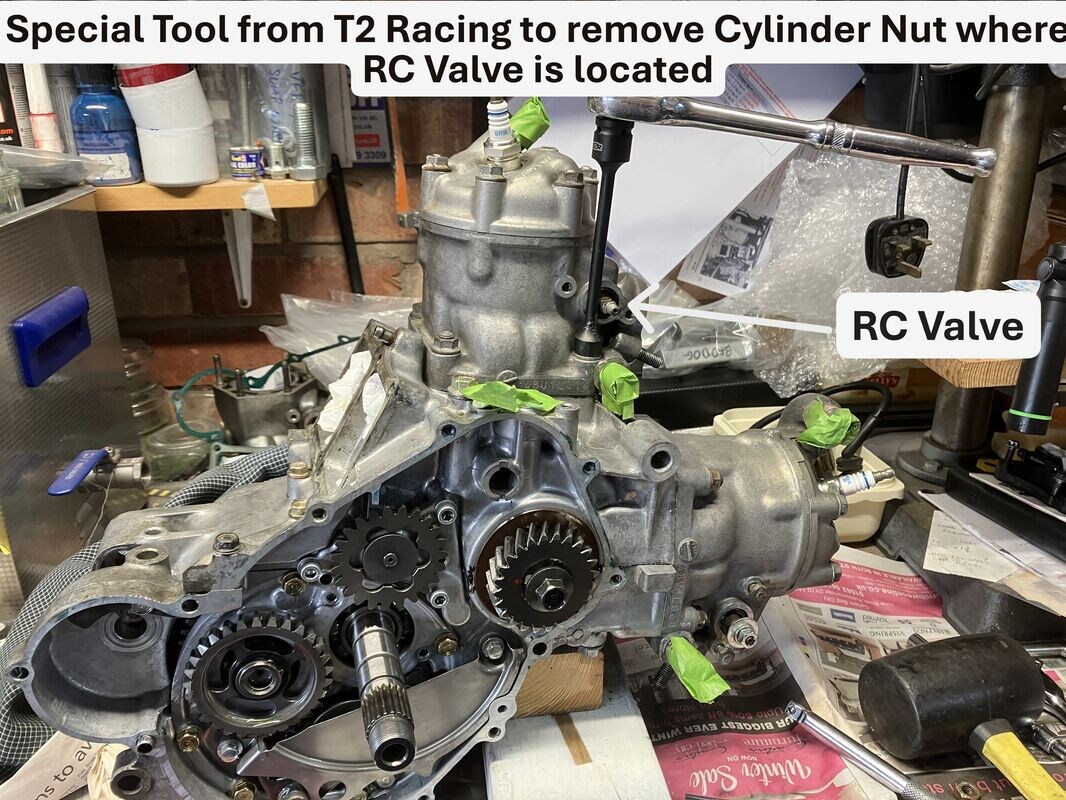
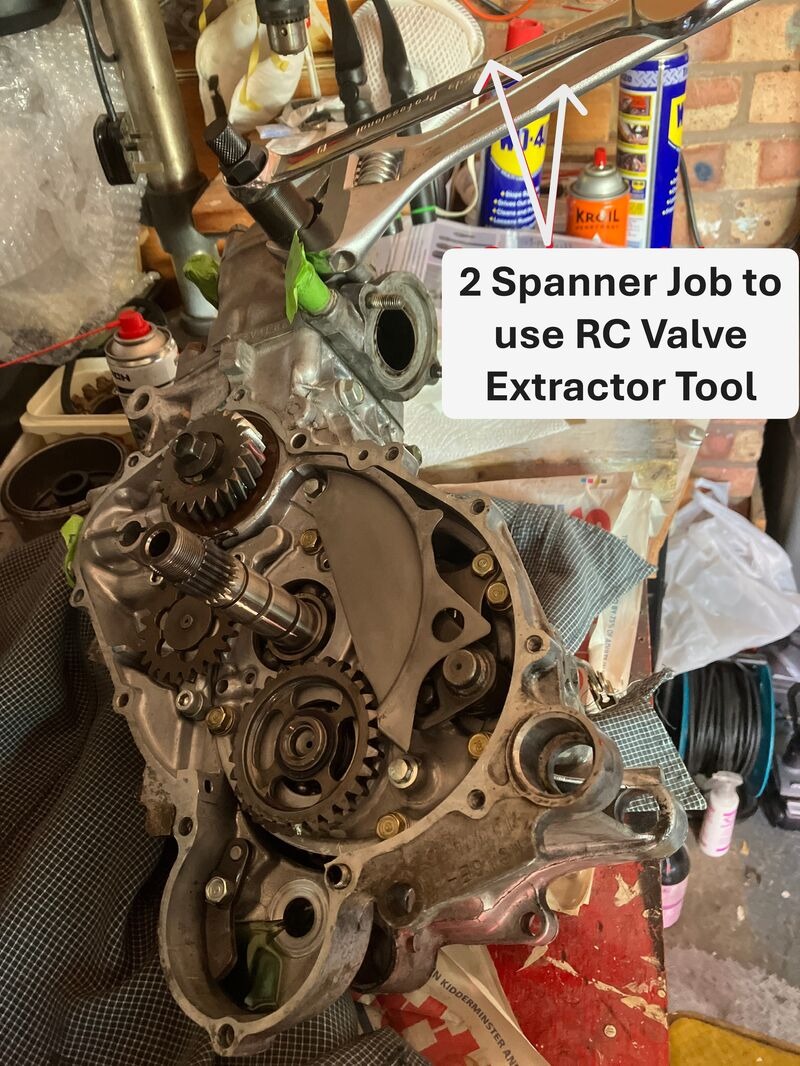
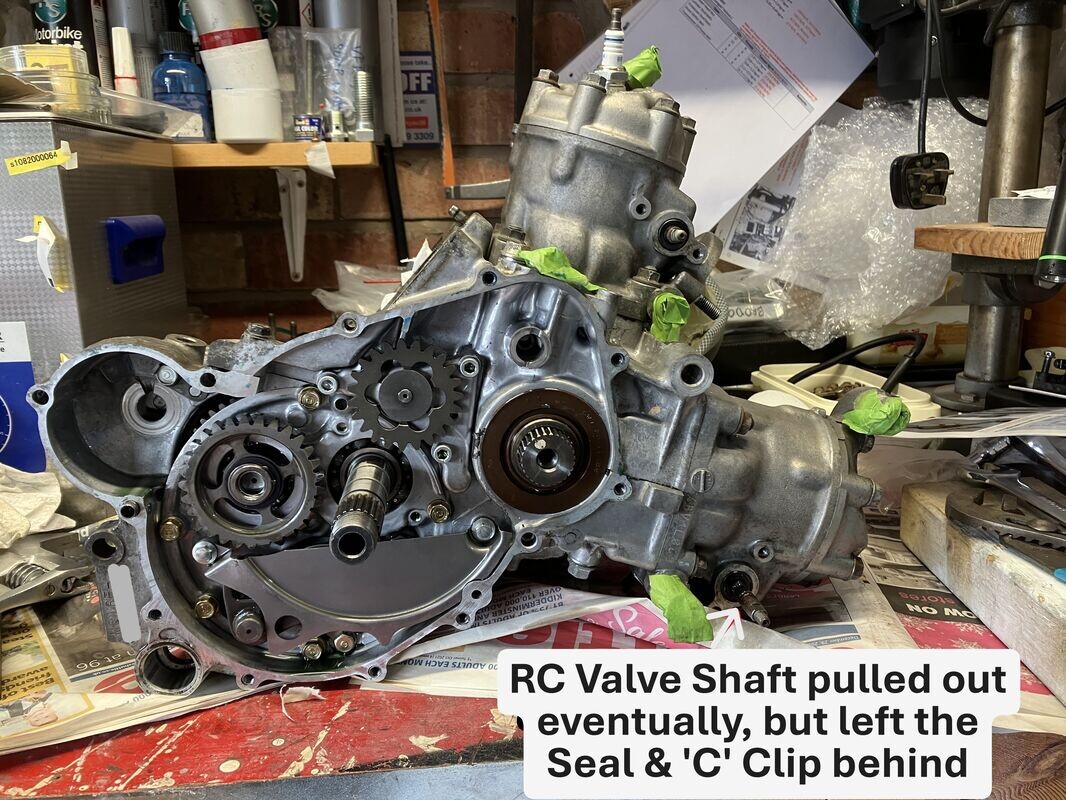
    (5) New DMR-JAPAN Wide RC Valve Pulley Type2 with a wide Pulley & over-torque release mechanism (Our attempt to get the MC28 RC Valves to mate as best as you can with the MC18’s PGM II).


NOTE: More detail of these issues above will be dealt with as I continue to add to this topic in the coming weeks.
Most of the parts above were obtained via: WEBIKE JAPAN, AMAZON JAPAN, JAUCE JAPAN & Jap4 UK Ltd.

After riding the NSR250 for a little while, the MC28 Engine decided to be near impossible to start, so a re-think led to a total rebuild of an Engine for the MC18 R5K as follows.

MC18 R5K Engine Rebuild
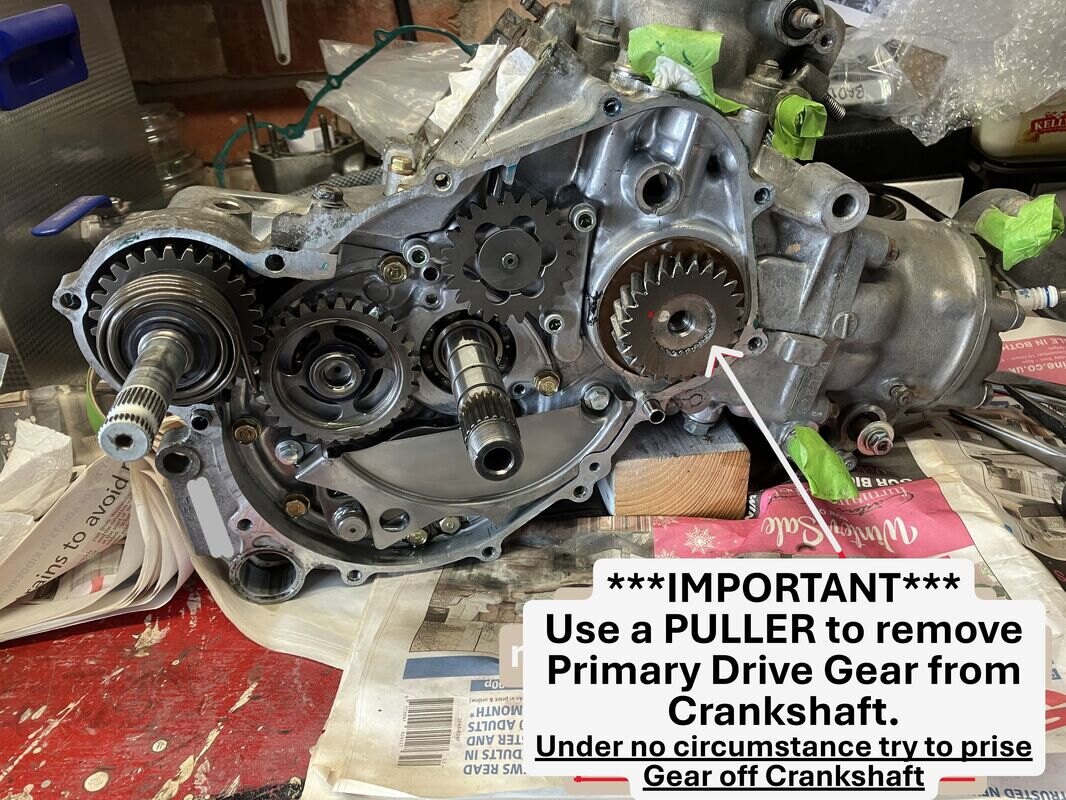
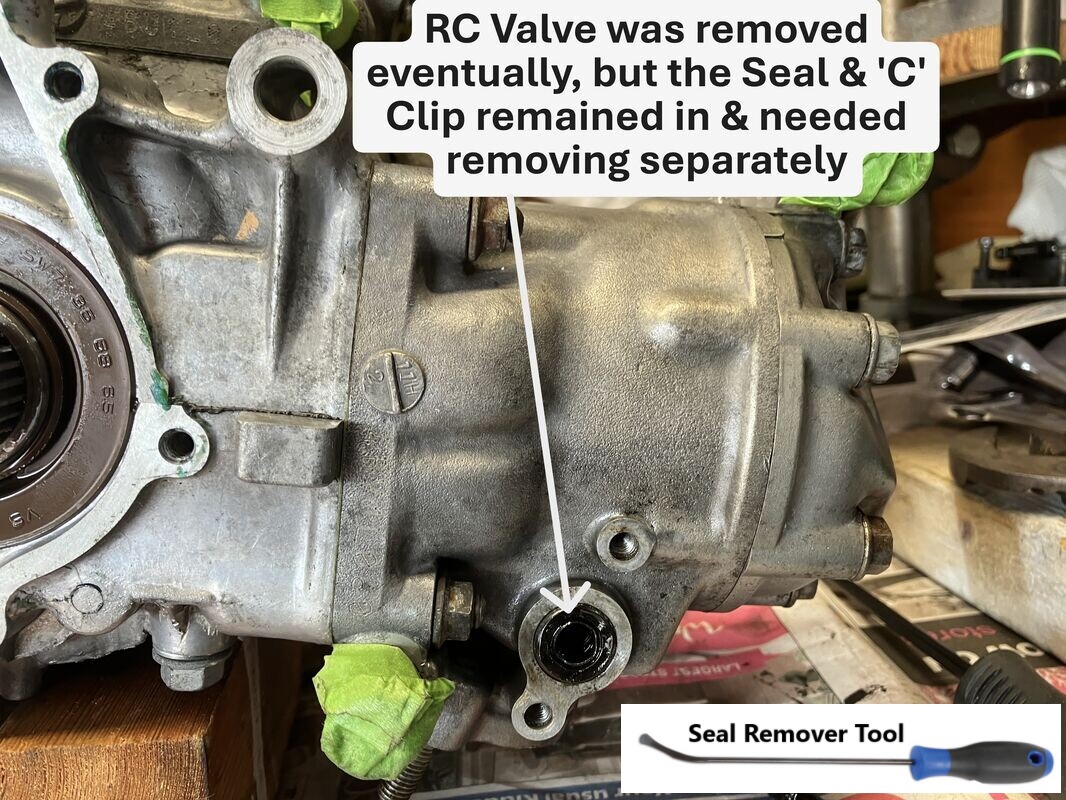
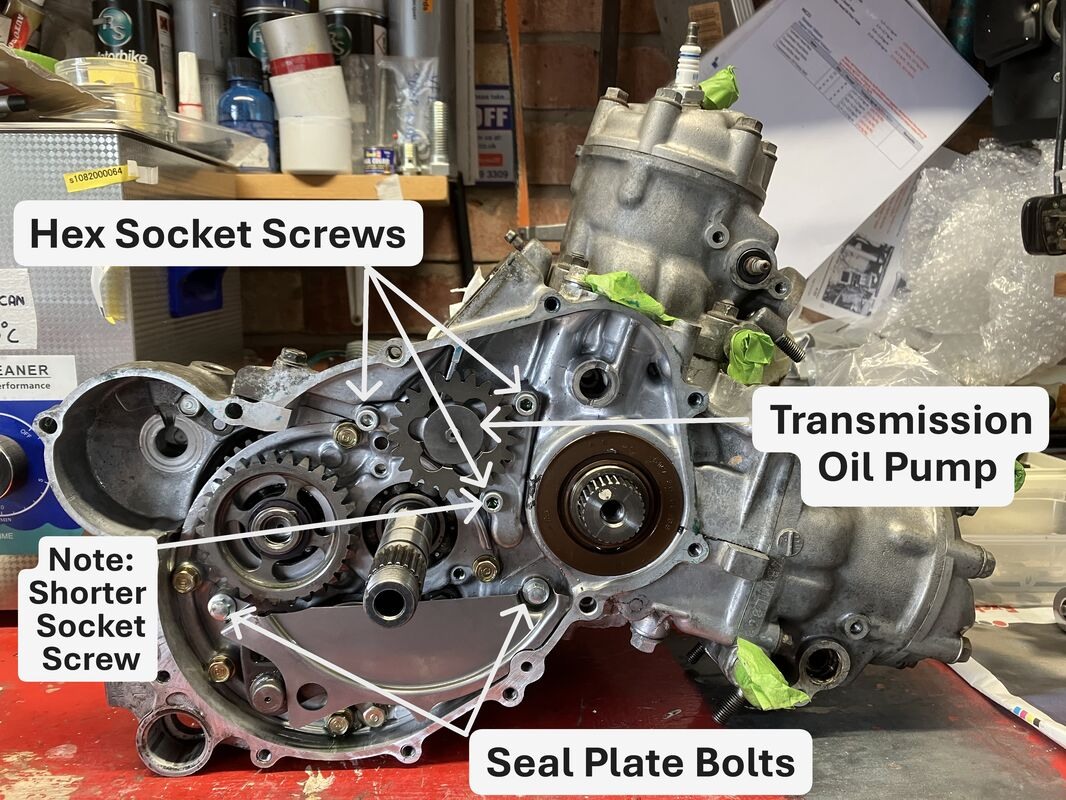
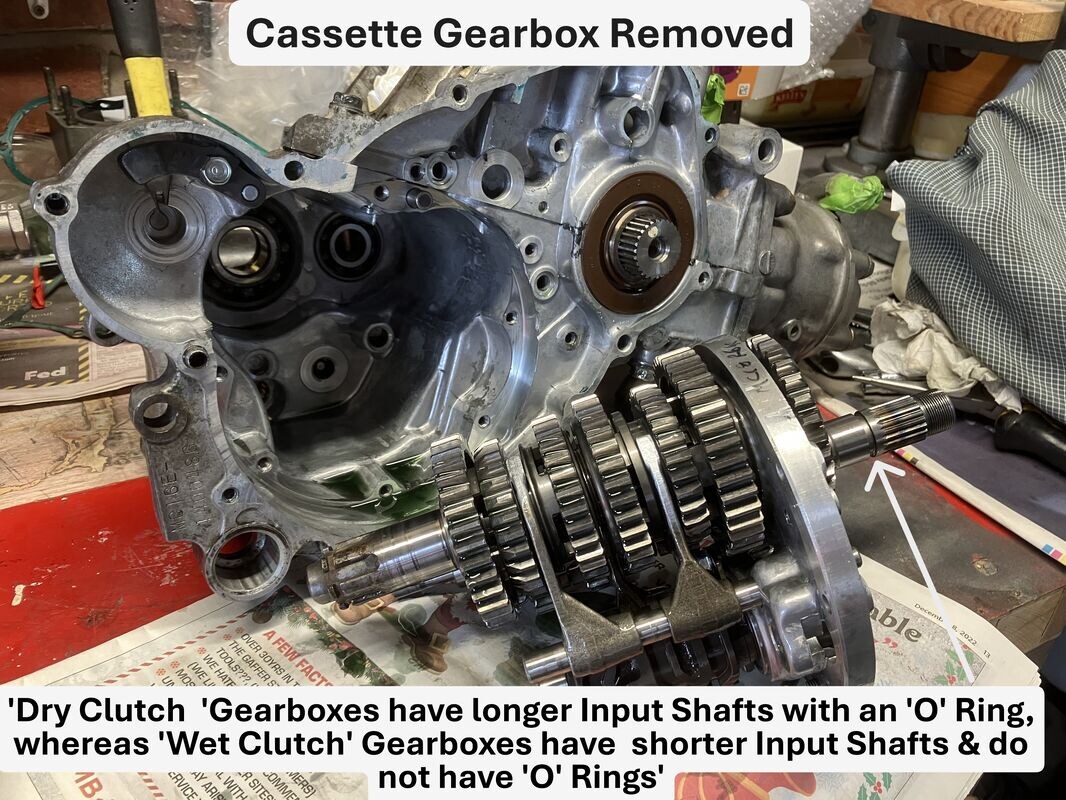
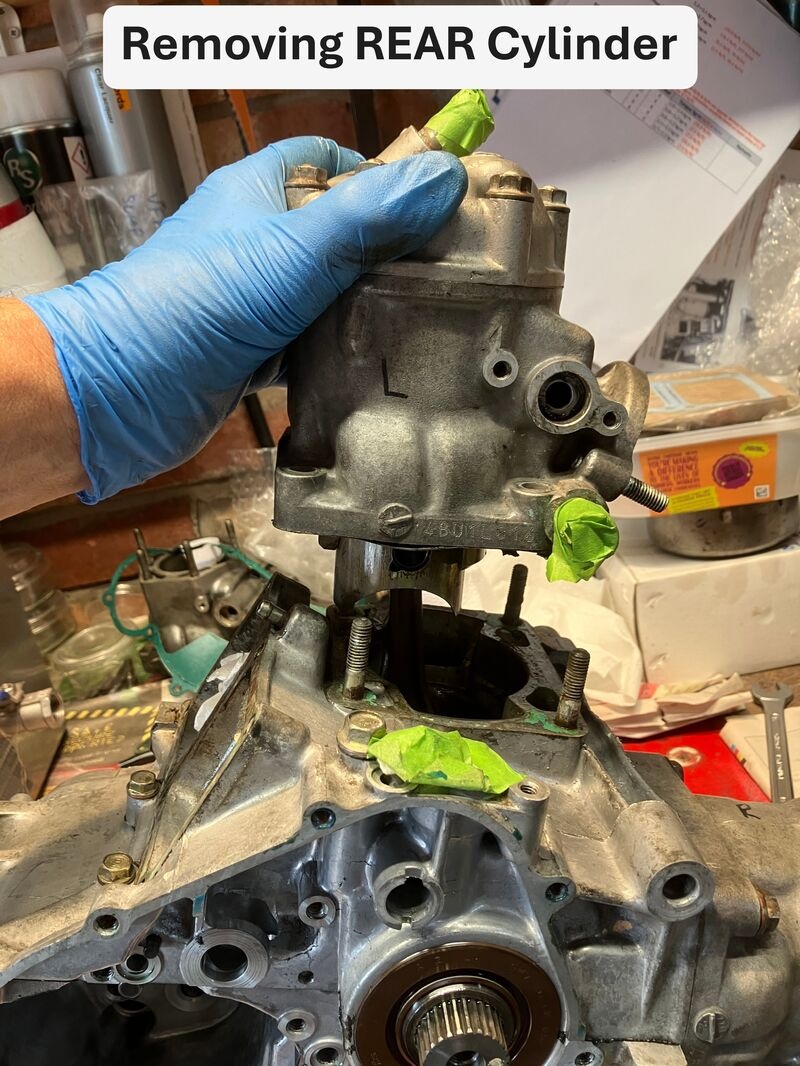
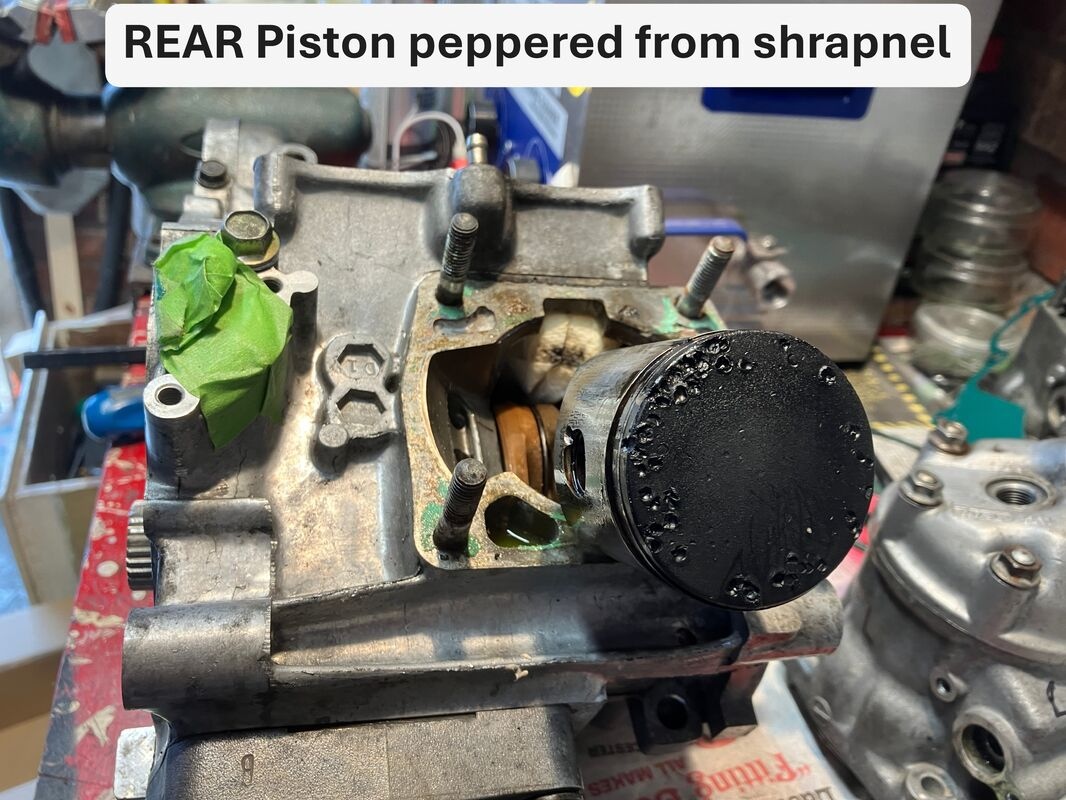
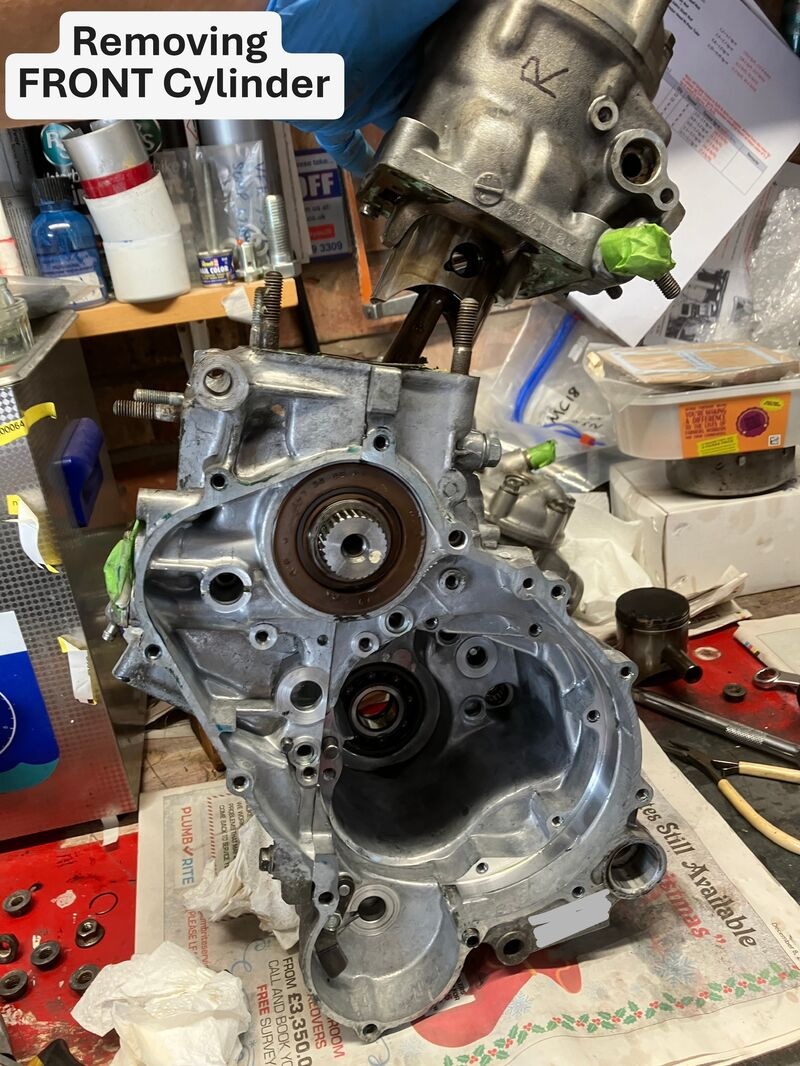
Rebuilding the MC18 consisted of using the MC28 Crankcase, new or rebuilt MC28 Crankshaft (Steve at Performance Engineering, Plymouth) with the MC18’s Cylinders (Nikasil plating by Langcourt, Weston-Super-Mare, UK), original Cylinder Heads, Stator & Pick-ups.


Detailed instructions on the complete Engine strip and rebuild are on the NSR WORLD site which I found extremely useful and as you will see a great deal of similarity. The MC28 Engine was removed for cleaning prior to dismantling & all parts open to any ingress were taped off and sealed.


Last edited by philup_7@hotmail.com on Tue Mar 10, 2026 10:35 am; edited 4 times in total
Back to top


philup_7@hotmail.com

 
Posts: 70
Joined: 09 Oct 2018

Location: Worcestershire
    Send private message View user's profile
    Reply with quote  

Mon Mar 09, 2026 3:12 pm » Post: #2 » Download Post

MC28 2T Oil Pump
Although the MC28 2T Oil Pump was removed prior to the Engine removal, I’ve included a Picture detailing the additional Oil Way that isn't present on the MC18.


Last edited by philup_7@hotmail.com on Tue Mar 10, 2026 10:28 am; edited 3 times in total
Back to top


philup_7@hotmail.com

 
Posts: 70
Joined: 09 Oct 2018

Location: Worcestershire
    Send private message View user's profile
    Reply with quote  

Mon Mar 09, 2026 3:46 pm » Post: #3 » Download Post

Dry Clutch Removal
Remove of the outer Dry Clutch Cover to reveal the Dry Clutch Pressure Plate.
Undo (in a crisscross pattern 2-3 steps) & remove the 5 Bolts, 5 Clutch Pressure Plate Springs & Pressure Plate to reveal the Lock Nut.


Remove the Clutch Lifter piece (in the centre) & unstake the Lock Nut with a small Screwdriver lightly tapping it with a Hammer, then undo the Lock Nut using an appropriately sized impact Socket & Cordless Impact Driver (the Lock Nut came off fairly easily, which is unusual for me).
The Lock Nut, Thrust Washer, Clutch Plates & Clutch Inner Basket/Drum can now be removed.


Undo the 6 Bolts holding the Clutch Outer Basket & remove the Basket.


Last edited by philup_7@hotmail.com on Tue Mar 10, 2026 11:31 am; edited 4 times in total
Back to top


philup_7@hotmail.com

 
Posts: 70
Joined: 09 Oct 2018

Location: Worcestershire
    Send private message View user's profile
    Reply with quote  

Mon Mar 09, 2026 3:53 pm » Post: #4 » Download Post

Dry Clutch Housing Removal
Righthand Crankcase Cover Bolts removed revealing the new DMR-JAPAN Water Pump from WEBIKE JAPAN previously installed due to the old Plastic drive gear cracking (not surprising given its age, bit like me really).


The MC28 Water Pump differs to the MC18/21 regarding the number of teeth on its drive gear, MC28 has 25 teeth and the MC18/21 has 26 teeth so made sure I got the correct pump. The one I chose was Product E4-28005 from WEBIKE JAPAN as it came with the Seals & Gaskets, although it is also available as separates’.

General Components under the Dry Clutch Housing Cover.


Last edited by philup_7@hotmail.com on Wed Mar 11, 2026 12:33 pm; edited 3 times in total
Back to top


philup_7@hotmail.com

 
Posts: 70
Joined: 09 Oct 2018

Location: Worcestershire
    Send private message View user's profile
    Reply with quote  

Mon Mar 09, 2026 4:04 pm » Post: #5 » Download Post

Flywheel Removal
Using a Flywheel Puller tool (TYGA TYTO-0014), 19mm Ring Spanner & Adjustable Spanner the next job was to remove the Flywheel Bolt & Flywheel, which to my surprise came off very easily (have had very bad experiences with Flywheels in the past mostly to do with cars though lol!).


Last edited by philup_7@hotmail.com on Tue Mar 10, 2026 11:35 am; edited 1 time in total
Back to top


ericandchi
Site Moderator
Site Moderator
 
Posts: 340
Joined: 03 Apr 2013

Location: Texas
1994 Honda NSR250 MC28SP
    Send private message View user's profile
    Reply with quote  

Mon Mar 09, 2026 10:08 pm » Post: #6 » Download Post

Great pics and annotations. This will be very helpful to others in the future.
Back to top


Andy
Site Admin
 
Posts: 12085
Joined: 19 Jan 2004

Location: Devon, UK
1991 Honda NSR250 MC21
    Send private message View user's profile
    Reply with quote  

Tue Mar 10, 2026 7:44 am » Post: #7 » Download Post

Great work, Phil!

A little feedback on the annotations. Some, particularly the red & green, do not really have good contrast. I can imagine them being difficult to read for some; especially non English speakers who may try to use Google Lens or similar on the images.

I think it would be better to either have white text on a back background, or black on white, and maintain a consistent look.

For example:


I appreciate you may not have/want to spend the time fiddling around with background boxes, and sincerely appreciate the effort going into the thread. Just some feedback for you.
_________________
Andy.
NSR-WORLD.COM

Please keep all responses to Forum posts on the Forum so that others may benefit.

Please DO NOT PM me for technical advice. My time is precious, and you will probably receive a faster response on the Forum anyway.


Check us out on Facebook! Please "like" our page!
Back to top


philup_7@hotmail.com

 
Posts: 70
Joined: 09 Oct 2018

Location: Worcestershire
    Send private message View user's profile
    Reply with quote  

NSR250 MC18 Rebuild

Tue Mar 10, 2026 10:50 am » Post: #8 » Download Post

ericandchi
Many thanks anything to help such a great forum as we have so much help in the past.
This and I have say totally honestly has to be one of, if not, the best forums out there.
Regards
Phil
Back to top


philup_7@hotmail.com

 
Posts: 70
Joined: 09 Oct 2018

Location: Worcestershire
    Send private message View user's profile
    Reply with quote  

Tue Mar 10, 2026 12:17 pm » Post: #9 » Download Post

Cleaning Carb Insulator Mating Surface
Following NSR WORLD’s advice the Carb Insulator mating surface was very carefully & painstakingly cleaned using a new & resharpened (using a Whetstone) Stanley Blade at a shallow angle.


Back to top


philup_7@hotmail.com

 
Posts: 70
Joined: 09 Oct 2018

Location: Worcestershire
    Send private message View user's profile
    Reply with quote  

Tue Mar 10, 2026 12:48 pm » Post: #10 » Download Post

Primary Drive Gear Removal
This to be done in two stages, initially, using DMR-JAPAN Primary Gear Holder TL006 ( 2 Bolts securing it to the Crankcase ) to lock the Primary Drive Gear & undo its Bolt.

However, leave the Gear in place for the time being as it makes it a little easier to rotate the Crankshaft and get the Pistons in the right place to remove later on, unless of course you have removed the Cylinders beforehand.


The Clutch Primary Drive Gear was removed a little later on (not in these Images) and also the Kick Start Mechanism was removed before it fell out!!
Back to top


philup_7@hotmail.com

 
Posts: 70
Joined: 09 Oct 2018

Location: Worcestershire
    Send private message View user's profile
    Reply with quote  

Tue Mar 10, 2026 2:58 pm » Post: #11 » Download Post

RC Valves Removal
Removed the RC valves while in situ to make like easier (If that ever happens!!).

The Cylinder & Cylinder Head Nuts were slackened off prior to RC Valve removal, you don’t need to do it this way round, just wanted to try out T2Racing special Cylinder Nut Tool to see if it worked without any issues LOL.


Probably didn't need to use the special Cylinder Nut Tool if I took the RC Valves out beforehand, but most probably will need during assembly as it's easier (well I think it is) to assemble the RC Valves whilst the Cylinder is on the Bench (well that's my excuse m'lud).


The RC Valves were sprayed with some KROIL penetrating oil thru the Exhaust Port and left overnight with the hope it would help the extraction process. However, it was still a struggle extracting the RC Valves as the Seals & ‘C’ Clips refused to budge & had to be extracted separately afterwards with my trusty Seal Remover Tool.


Back to top


Reply to topic   printer-friendly view
Page 1 of 1   Download Topic

Members' NSR Builds

You cannot post new topics in this forum
You cannot reply to topics in this forum
You cannot edit your posts in this forum
You cannot delete your posts in this forum
You cannot vote in polls in this forum
You cannot attach files in this forum
You cannot download files in this forum

  • NSR250 Forums Index
  • All times are GMT
Powered by phpBB © 2001, 2005 phpBB Group


Hosted by NSR250dotNET © 2008 NSR250dotNET